Table of Contents
What Is Needed To Make Automatic VAT?
Just 5 things…
I. VAT product created
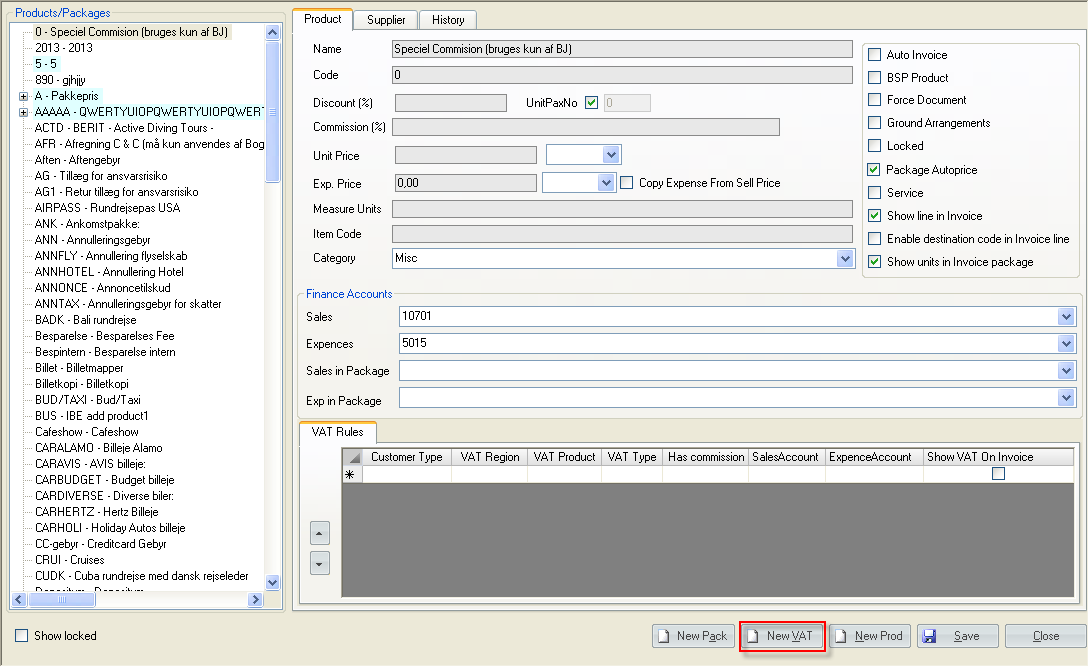
1. To create/edit existing VAT products, in the main TW menu go: Tools → Products…
2. Push ‘New VAT’ button or press a shortcut ‘Alt+V’:

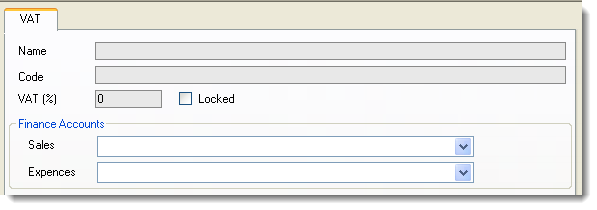
3. In the opened form fill in the basic VAT information (Name, Code, % and finance accounts by which the VAT information should be transferred to finance):

To disable VAT use ‘Locked’ checkbox.
Locked VAT product cannot be linked to VAT rules, but will stay among the VAT rules for those Packages/Products to which it has been already linked.
As soon as there can be relations between VAT and other data in TravelWise, it is impossible to remove VAT at all – only to lock it.
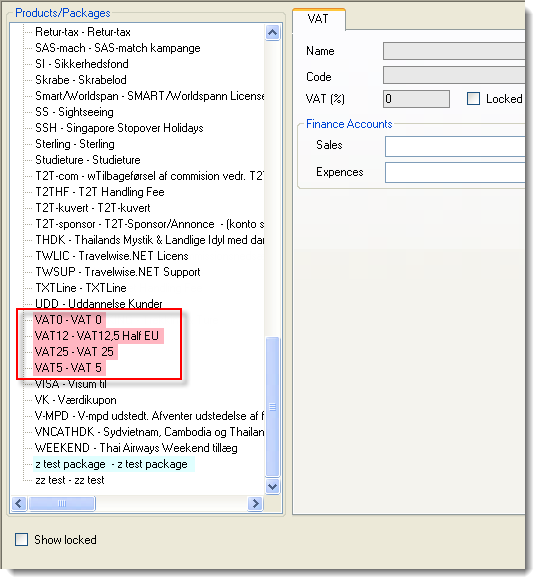
4. Right after saving the newly created VAT, highlighted with pink, is going to appear in the ‘Products-Packages-VAT’ tree in the left:

Locked VAT product is not shown in 'Products-Packages-VAT' tree until 'Show Locked' checkbox is enabled.
II. Business model selected in a Customer’s profile:
- Business to customer (B2C);
- Business to business (B2B);
- No VAT (automatic VAT rules won’t be applied for a Customer, but it will be possible to set VAT in Invoice line manually).
III. Fee regions assigned
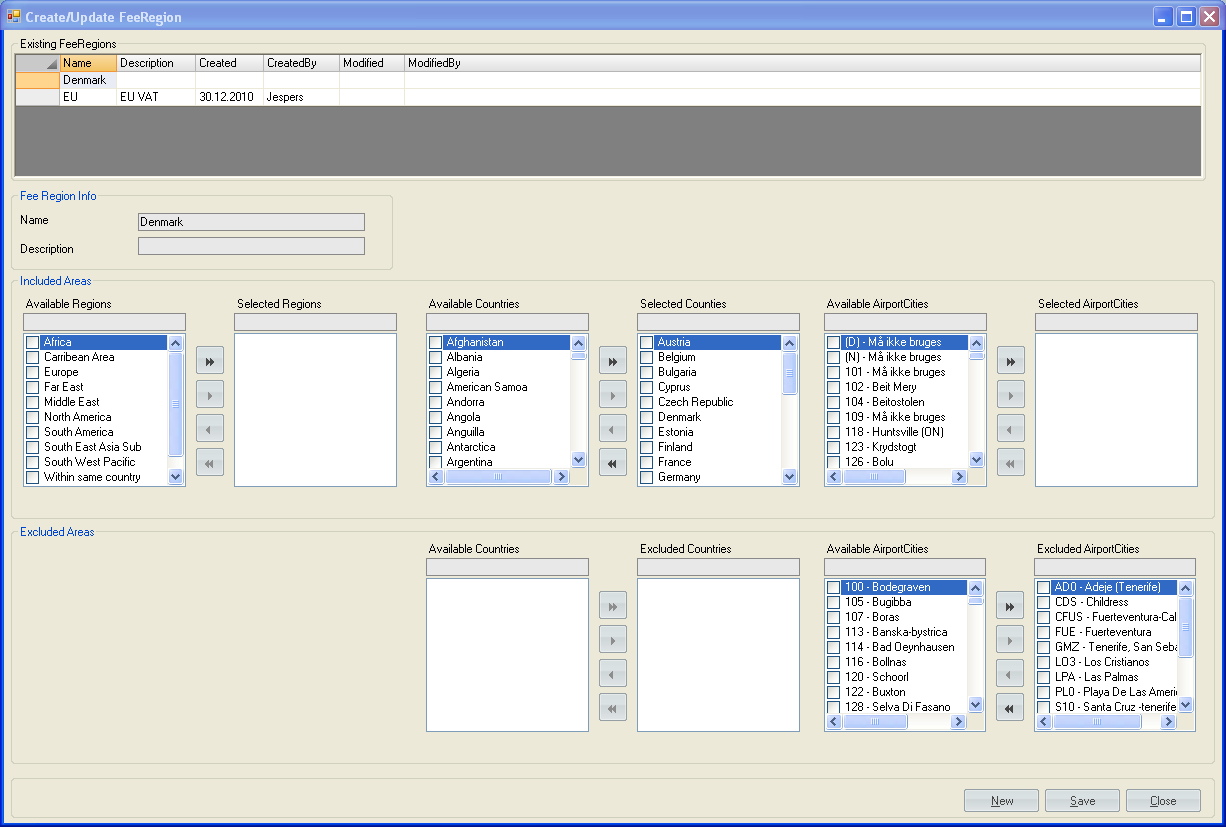
To create/edit Fee Regions (i. e. regions for which VAT should be handled), in the main TW menu go: Tools → General data → Geographic Places → Fee Region

To create a Fee Region:
- Press ‘New’ button
- In ‘Fee Region Info’ fill in the ‘Name’
- In ‘Included areas’ select the ‘Regions’. (this list is taken from TrevelWise library stored in: Tools → General data → Geographic Places → Regions; under the same ‘Geographic Places → …’ submenu the Countries and Cities/Airports are kept).
- In ‘Excluded Areas’ select those Countries, Cities for which the VAT rule, which is going to be applied for the newly created region, is not supposed to take an action.
- Push ‘Save’ button (‘Alt+S’).
![]() NOTE:
NOTE:
In case the country was selected, the cities which are related to that country become selected automatically and are not visible in ‘Available Airport Cities’, BUT
are shown in ‘Excluded Areas’ section and can be excluded separately.
To edit a Fee Region:
- Select any Fee Region in the ‘Existing FeeRegions’ list.
- Make any changes.
- Push ‘Save’ button (‘Alt+S’).
Insurance Region
'Insurance region' instance is used for B2B statistics. New control is going to be accompanied to existing 'Fee Region'. So, that the same form could be used according to the selected mode: 'Fee Regions' or 'Insurance Regions'.
IV. VAT rules set for a certain Product or Package
‘Product’ and ‘Package’ have got different controls for VAT rules defining:
In difference to ‘Product’ ‘Package’ does not have ‘Has Commission’, ‘Sales Account’, ‘Expence Account’ controls:

![]() NOTE:
NOTE:
• 1 line in the grid highlighted above = 1 VAT rule.
• The higher the rule in the list, the more priority it has. TW picks the rules one by one and applies the 1st which fits conditions. In addition VAT rule with ‘Has Commission’ = yes or no has higher priority compared to VAT rule with ‘Has Commission’ = No matter.
All fields except ‘Sales Account’, ‘Expence Account’ in ‘VAT Rules’ are mandatory:
- Customer Type: B2B, B2C, All. By selecting a customer type you match the VAT rule with a Customer, who has corresponding ‘Business model’ set in his profile (see point II. ‘Business model selected in a Customer’s profile’).
- VAT Region: Regions created in ‘Fee Regions’ (see point III. ‘Fee Regions assigned’).
- VAT Product: list of VAT products; ‘locked’ VATs are not displayed
- VAT Type: Full amount included, Full amount added, Margin amount included, Margin amount added (see chapter ‘WHICH VAT CALCULATION SCHEMAS EXIST IN TW?’).
- Has commission: Yes, No, No matter. If Invoice line has commission (commission % field, or amount field), rule with Has commission = yes is applied, and if line got no commission, then only rule with Has commission = no is applied. Rule with No Matter option is applied to all lines. ‘No matter’ option has lower priority compared to ‘Yes’ or ‘No’.
- Expence Account is used when products with VAT have to be transferred in finance system under their own financial accounts. If it stays empty the value of ‘Expence Account’ from product profile is used instead.
- Show VAT On Invoice: ‘Show VAT’ value is copied into Invoice line when certain rule is applied and its state becomes saved together with Invoice, but it is possible to change it.
- if checked (enabled), then the VAT Total is not displayed in ‘Invoice’ report in ‘Total VAT’ line, which goes right after ‘Total’ (for all Invoice templates); and after invoice line (only for BK Invoice template);
- if unchecked (disabled), then the VAT Total is summed up with the sell price and ‘Total VAT’ separate line does not appear in ‘Invoice’ report at all (until other products with VAT do not require that line).
![]() NOTE:
NOTE:
It is allowed to delete the mistakenly added VAT rule line only when it is fully completed (values in all columns for a line are recorded in TW).
V. Invoice line origin and destination
Automatic VAT rule becomes applied when the line initially has got an origin and destination, which belong to the VAT region (see ‘Destination’ column in ‘Invoice Lines’ tab in ‘Invoice’ form), i. e. was generated based on a segment,
OR when the VAT product was added manually,
OR when origin and destination were auto completed (controlled by a special host company setting ‘InvoiceLineDestinationFillAutomatically’.
![]() NOTE:
NOTE:
Automatic VAT rule won’t be applied for the lines, which got destination auto completed by a validation with a message:
‘The destination is empty for some Invoice lines.
Press 'Yes' to autocomplete it with a main Invoice destination '[Destination Name]’?
Press 'No' to select Invoice lines destinations manually.’ (controlled by ‘InvoiceLineDestinationCodeNotEmpty’ host company setting).


