Table of Contents
Hotel Data Import
Navigation: Tools → Import → Hotel Data Import
The module is used to create new hotels if they do not exist in TravelWise database and to update information for existing hotels.
Supplier provides hotels in Excel (.xls) file. There are names, codes, locations, images, descriptions and other information there.
Functionality
‘Hotel Import’ form (see Picture 2).
Step 1:
- select Import mode;
- xls-file with hotels’ data;
- select the Supplier.
There are 3 Import modes in TW:
- Import Image: this mode is used to import hotel images. It does nor affect existing old images.
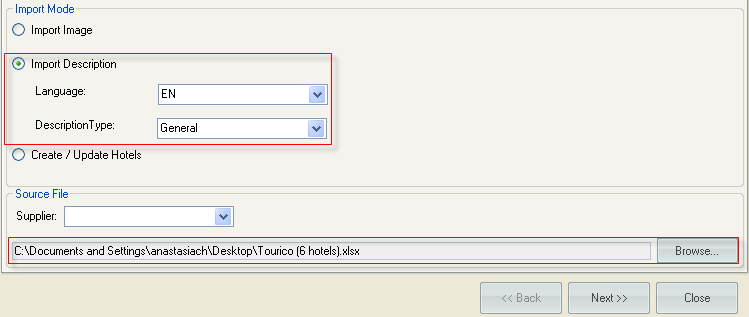
- Import Description: this mode is used to import hotel description. It is necessary to determine Language and Description type in this mode. If there is description with the same Language and Description type as have been determined on Step 1, then this description will be updated. If there is no such a description, a new one will be created.
- Create / Update hotels: this mode can be used for creating new hotels in TW database and / or updating existing hotels (most data except images and description).
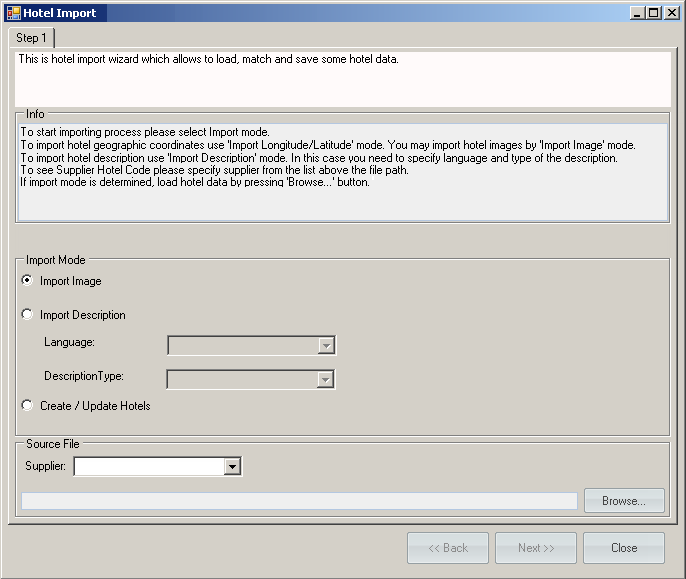
Picture 2 – ‘Hotel Import. Step 1’
It is necessary to load xls-file with hotels’ data. It may be any file sent by supplier or file created manually by agent or your file created for test purpose with one column and one row – whatever you want. The file’s expansion can be .xls (Microsoft Office Excel 1997-2003) or .xlsx (Microsoft Office Excel 2007).The source file can contain hotel code (multiple codes are also supported), hotel name, address, city code, city name, zip code, phone, fax, description, image URL, latitude, longitude, total amount of rooms, etc.
To load the source file press ‘Browse’ button and select the path to the file.
Select a supplier in the ‘Supplier’ dropdown list to get possibility for matching hotels in the source file and database by Supplier’s hotel codes. However it is not necessary. If supplier has not been selected, hotels can be matched by other parameter.
Create/Update Hotels mode
Step 1
- Go to Tools → Import → Hotel Data Import;
- Select ‘Create / Update hotels’ import mode;
- Select ‘Tourico’ supplier;
- Select the source file;
- Push ‘Next’ button.
Step 2
At Step 2 hotels from the source file should be matched with hotels in database (they are called ‘target’):
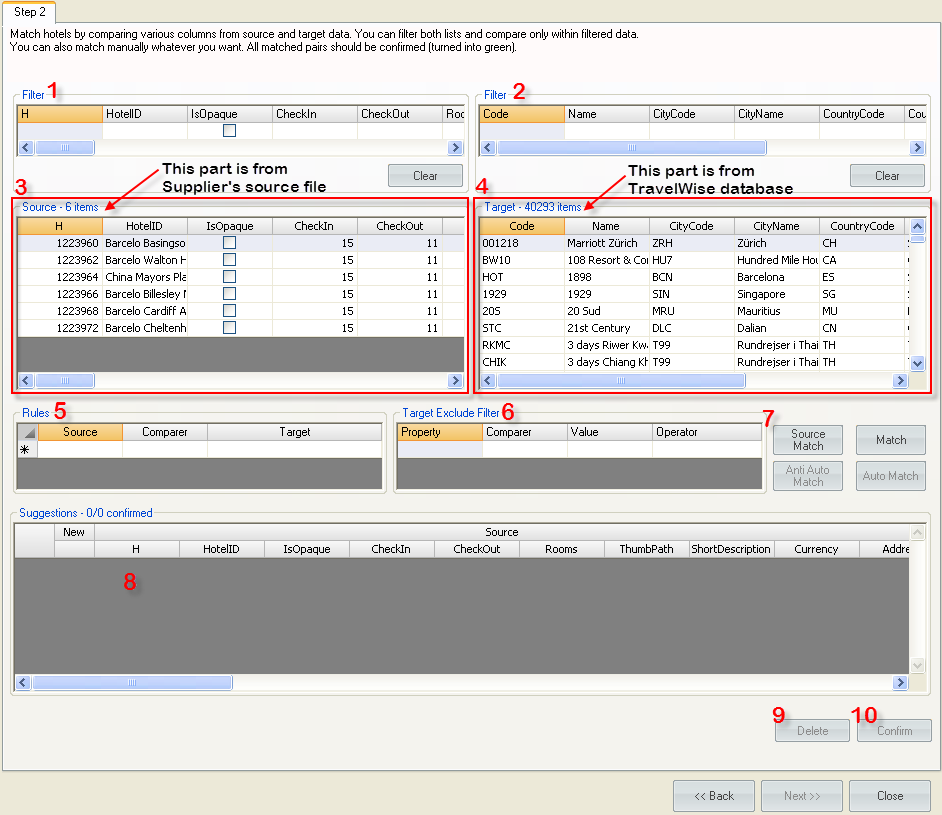
Picture 3 - Step 2 of Hotel data import
1. Filter. It is needed for searching a hotel from the whole list automatically by using several filter conditions. Can be applied only to the list from xls-file.
Conditions can be the following:
HotelCode, HotelName, CityCode, CountryCode, HotelAddress, HotelPostCode, HotelTelePhone, HotelFax, HotelEmail, HotelStarCode and etc. – whatever there is in the xls-file.
If it is needed to compare only hotels with some special characteristics, then apply a filter with these special features to all records. For example, put ‘Lon’ in the ‘CityCode’ field – in the results grid there will be shown only hotels which are situated in London.
(see Picture 4 below)
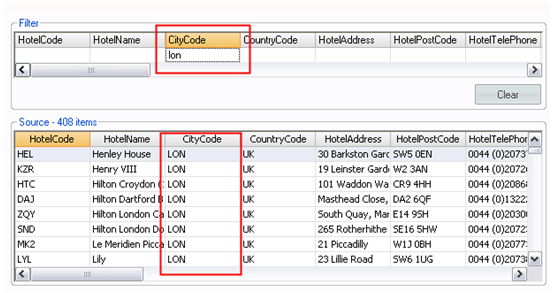
Picture 4 – Filter for Source grid
2. Filter. It is needed for searching a hotel from the whole list automatically by using several filter conditions. Can be applied only to the list from TravelWise DB.
There are the following conditions:
Code, Name, Latitude, Longitude, CityCode, CityName, CountryCode and etc. – all of them are taken from our DataBase.
And again if it is needed to compare only hotels with some special characteristics there is a possibility to apply a filter with these special features to all records.
3. Source. This area is used for showing all information imported from xls-file. Each hotel can have any characteristics. For example:
HotelCode, HotelName, CityCode, CountryCode, HotelAddress, HotelPostCode, HotelTelePhone, HotelFax, HotelEmail, HotelStarCode and etc. – whatever there is in the xls-file.
4. Target. This area is used for showing all information got from TravelWise DataBase. Each hotel has the following characteristics:
Code, Name, Latitude, Longitude, CityCode, CityName, CountryCode and etc. – all of it gets taken from TravelWise DataBase.
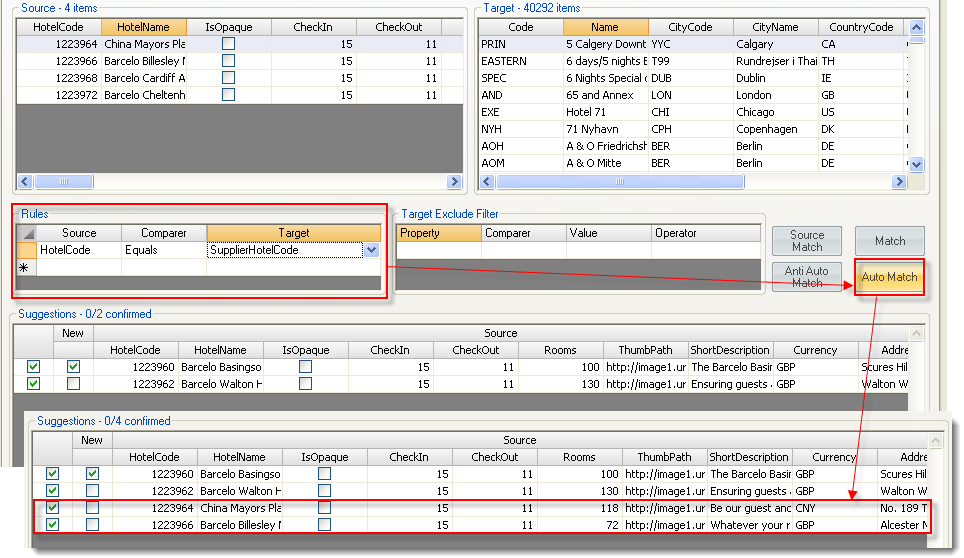
5. Rules. This area is used to set the rule between data imported from xls-file and data got from TravelWise DB. It is needed to match only specific hotels with the same names or hotel codes, because all hotels from both sides couldn’t be matched if they don’t have any equal data. In the example below I decided to select all hotels with equal codes (see Picture 5):

Picture 5 - Rules for auto matching
At the example above HotelCode means the code of the hotel which is initialized for this hotel by supplier internally. Code means the code of the hotel in TravelWise database. Compare it and get a list of hotels with equal codes in both places as the result.
6. Target exclude filter. This area is used to filter all data got from TravelWise DataBase and it is needed because we have a lot of hotel with empty and not empty fields and if we decide to match all hotels, then all entered data will be replaced by the data from the file.
Several Excluded filters can be applied in a time. (see Picture 6):

Picture 6 - Target exclude filter
If logical Operator is ‘AND’, then only those hotels will be shown, which do not start with ‘D’ and is not in ‘Bkk’.
If logical Operator is ‘OR’, then those hotels will be shown, which do not start with ‘D’ or is not in ‘Bkk’.
7. There are 4 ‘match’ buttons, so there are 4 different ways how to match hotels. Hotels can be matched manually (one by one) or automatically (by the system if the ‘Rule’ (5) has been determined).
- Button ‘Match’. This button is used to match the current selected hotels the cursor is placed at the moment at.
- Button ‘Auto Match’. This button is used to match all the hotels filtered by the current conditions. The conditions are determined in ‘Rules’ area. We can use ‘Match’ and ‘Auto Match’ buttons a lot of times and all newest couples will be added to the current list in suggestions area and simultaneously they will disappear from ‘Source’ and ‘Target’ grids.
- Button ‘Source Match’ is used to select hotels to be created. This button allows to match one hotel a time.
- Button ‘Anti auto match’. This buttons is used to select all hotels that do not exist in TW database. The hotels are selected by the conditions, determined in ‘Rules’ area. All selected hotels are considered as new.
9. Suggestions area presents all the results after matching. At the left side there is a checkbox. The hotel with ticked checkbox can be confirmed, e.g. prepared to changes. The columns in this table are formed from ‘Source’ and ‘Target’ tables (there are ‘Source’ and ‘Target’ groups). Use the horizontal scroll bar to see all of them. If hotel is to be created, its ‘Source’ cells will be empty.
10. Button ‘Delete’. This button is needed to delete the hotels, which are not expected to be compared and updated from the list. All deleted from this list data will be returned back to ‘Source’ and ‘Target’ grids above.
11. Button ‘Confirm’. By pressing the button you agree to compare these hotels in TravelWise DataBase with new information got from the source file. After this button has been pressed all the lines are highlighted with green and buttons are disabled (see Picture 10). That means all selected hotels are not updated yet, but are ready to be changed. Update will be done at Step 3 only. So, we can press ‘Next’ button then.
Picture 10 - Suggestions grid with confirmed hotels
Example
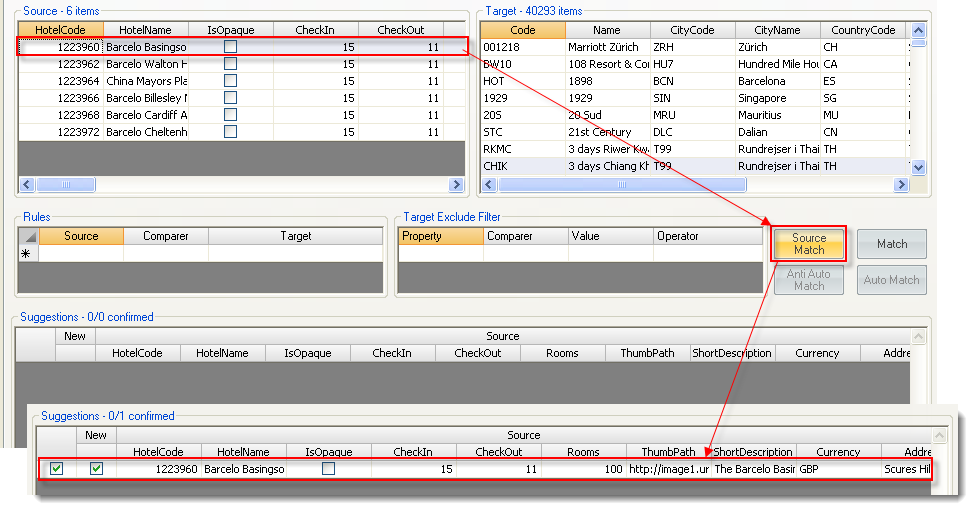
There are 6 hotels in the ‘Source’ table and 40293 in the ‘Target’ table.
- Select the first hotel (Barcelo Basingsoke Country) in the ‘Source’ table (it should be colored with light blue);
- Push ‘Source Match’ button
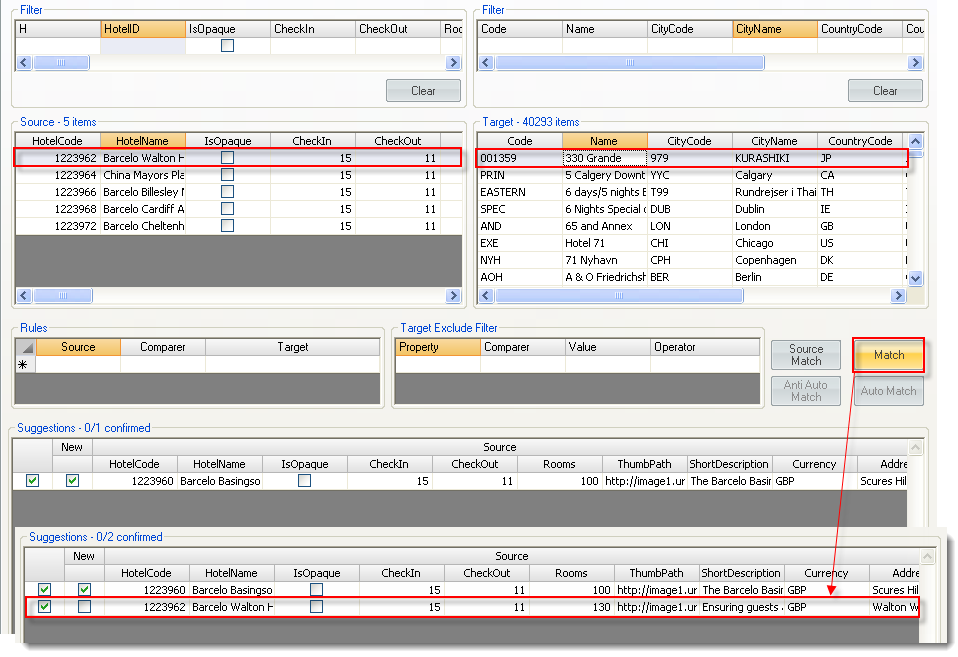
- Select the first hotel (now it is Barcelo Walton Hotel) in the ‘Source’ table;
- Select any hotel in the ‘Target’ table (I selected 330 Grande hotel, see Picture 8 below);
- Push ‘Match’ button;
So, the first hotel we added was hotel to be created in database. The second line in the ‘Suggestions’ table contains info about hotel to be updated (‘Target’ columns) with info from the source xls-file (‘Source’ columns). Both times we used manual way of matching hotels.
To match hotels automatically, we should determine matching rule (or rules):
- Set the following rule: ‘Source’ = HotelCode, ‘Comparer’ = Equals, ‘Target’ = SupplierHotelCode. This rule means that if ‘Hotel Code’ of the ‘Source’ hotel equals to ‘Supplier Hotel Code’ of the ‘Target’ hotel, then these two hotels would be matched and added to the ‘Suggestions’ table.
- Push ‘Auto Match’ button
It is possible to use the same rule for automatic matching of new hotels. In this case system will select all hotels from the ‘Source’ table, which do not fit the rule. In our example: if ‘Hotel Code’ of the ‘Source’ hotel is not equal to ‘Supplier Hotel Code’ of any ‘Target’ hotel, then this ‘Source’ hotel would be added to the ‘Suggestions’ table as new.
- Push ‘Anti Auto Match’ button.
- The last two hotels hotel (Barcelo Cardiff Angel and Barcelo Cheltenham Park) were added to the ‘Suggestions’ table.
As a rsult, hotels from the ‘Source’ table became matched.
Note!
If for one source hotel there are several target hotels according to the ‘Rules’, these hotels will not be matched automatically and the message ‘Some source rows were not matched because they have several suitable target rows. Please match them manually’ will be shown.
Example
Matching rule is ‘Source Hotel name’ equal ‘Target Hotel name’.
Source table: there is ‘Ambassador’ hotel
Target table: there are 2 ‘Ambassador’ hotels (in London and Bangkok)
These hotels cannot be matched automatically, because system does not know which one of the 2 target hotels should be matched with the source hotel.
What to do in such a situation?
- Set other matching rule (e.g. by hotel code);
- Match the hotels manually.
To proceed importing all matched hotels should be confirmed. Hotels can be confirmed by pressing ‘Confirm’ button. In case some hotels were added to the ‘Suggestions’ table by mistake, they can be deleted from the table by ‘Delete’ button. Please note, that both ‘Confirm’ and ‘Delete’ buttons will affect all hotels, which checked (has tick in the first column):  Picture 9 - The 'Suggestions' table with confirmed hotels
When hotels have been matched and confirmed, push the 'Next' button.
Step 3
Rules for hotel update and hotel creation should be determined at Step 3. In other words, we should select ‘source’ fields, from which data will be copied, and ‘target’ fields, to which the data will be inserted.
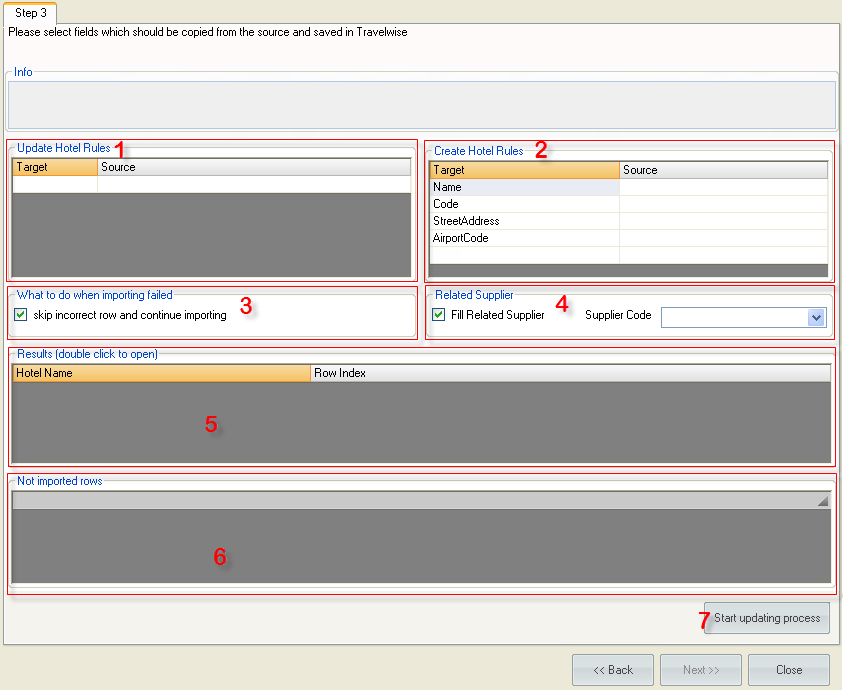
Picture 10 - Step 3 for 'Create / Update hotels' mode
There are two areas: ‘Update Hotel Rules’ (1) and ‘Create hotel Rules’ (2). The first one should be filled in if there are hotels to be updated and the second is for hotels to be created correspondingly.
Example
1. Determine the ‘Update Hotel Rules’:
Select ‘Phone1’ in the ‘Target’ cell:
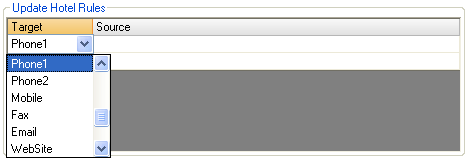
Picture 11 - 'Target' field
Double click on the ‘Source’ cell. ‘Edit column: Phone1’ form will be opened.
Select ‘Phone’ in the dropdown list and push ‘OK’ button.
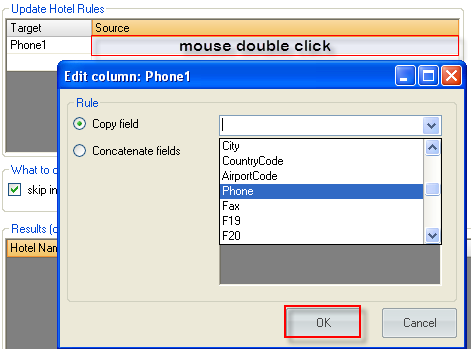
Picture 12 - 'Edit column' form
The first update hotel rule is ready. It means that data from the ‘Phone’ cell in the source xls-file will be inserted into field ‘Phone1’ in the data base for each matched hotel.

Picture 13 - Update phone field rule
One by one ‘Update Hotel Rules’ should be determined for each field which should be updated in hotels.
2. Determine the ‘Create Hotel Rules’
There are 4 obligatory fields which should be filled in for hotels to be created: Name, Code, Street Address and Airport Code. The ‘Airport Code’ can be replaced by ‘City name’.

Picture 14 – Obligatory fields for Create Hotel Rules
Double click the corresponding ‘Source’ field and fill in all obligatory fields:
Name = HotelName,
Code = HotelCode,
AirportCode = AirportCode,
StreetAddress = Address, Zip.
It is possible to select several ‘source’ fields for one ‘target’ field:
- open ‘Edit column: Street Address’ form (double click in the ‘source’ cell);
- select ‘Concatenate fields’ mode;
- select ‘Address’ in the ‘field’ cell;
- select ‘Zip’ in the second ‘field’ cell;
- select ‘, <SPACE>’ in the ‘delimiter’ cell:
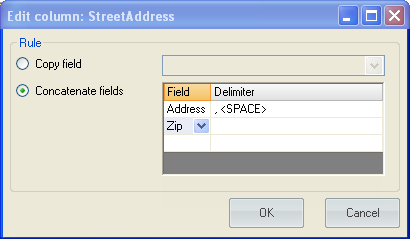
Picture 15 - Concatenate fields
It is also possible to select any non-obligatory fields for ‘Create hotel rules’. All selected fields will be filled in during hotel creation.
Select ‘Latitude’ and ‘Longitude’ fields:
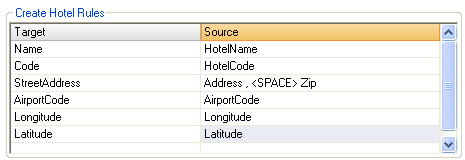
Picture 16 - Create Hotel Rules
3. ‘Related supplier’ area
This area is used to select related supplier.
All suppliers, which work with the hotel, are shown in the ‘Related suppliers’ table:
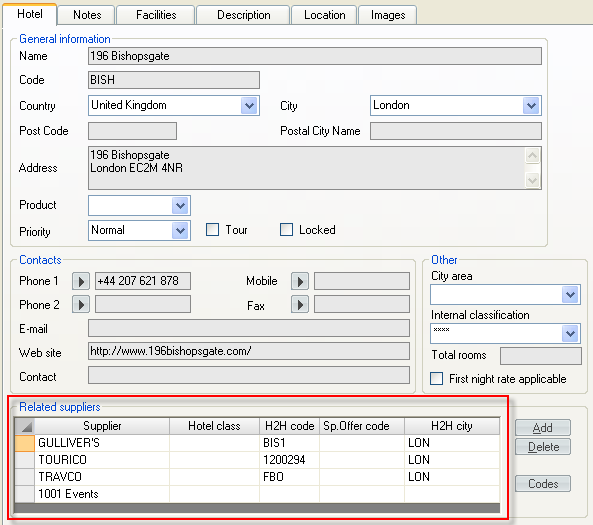
Picture 17 - Hotel related suppliers
If supplier was selected on Step 1, then it is possible to add this supplier to the Hotel Related Suppliers list.
Set ‘Fill Related Supplier’ checkbox TRUE, and select ‘Supplier Code’ in dropdown list (there are columns from the source xls-file):
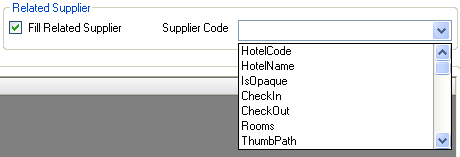
Picture 18 – Related Supplier Code
4. Updating process
Press ‘Start updating process’ button.
In a while import will be finished, and if all hotels have been imported successfully, the message ‘Import completed successfully’ will appear. In case there were errors during the import, the message ‘Import is complete, but some records could not be transferred. Please check the source file. See the reason of failure of importing in the ’Not imported rows’ table’ will be shown.
5. Import results
There are two areas: ‘Results’ and ‘Not imported rows’ on the form.
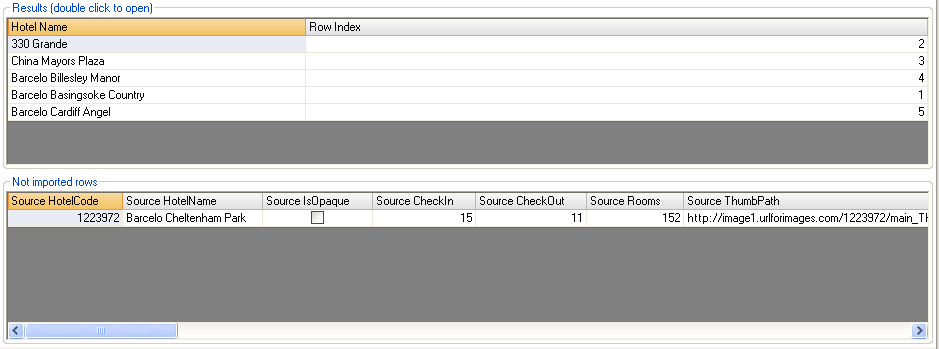
Picture 19 - Hotel Import results
‘Results’ shows all hotels, which were imported successfully, i.e. all hotels which have been created and all hotels which have been updated.
Double click on any hotel and it will be opened.
‘Not imported rows’ shows those rows, which was not imported by some reason. The reason is shown in the last column.
Use the bottom scroll bar to see it:

Picture 20 - Errors, which occurred during the import
So 'Barcelo Cheltenham Park' hotel was not created because the ‘AirportCode’ field in the source file is empty for this hotel.
The source file should be corrected and next time these hotels will be successfully imported.
Import Images mode
Import Images mode is used to add images to the hotels in Travelwise database.
Example
There is a source file from supplier. There are images’ URLs in it. There are several images for one hotel:

Picture 21 - The source file for image import
1. Go to Tools → Import → Hotel Data Import
Step 1
2. Select ‘Import images’ mode;
3. Select the source file;
4. Push ‘Next’ button.
Step 2
5. Use ‘target’ filter to find the hotels, which should be updated.
I used ‘Code’ filter:
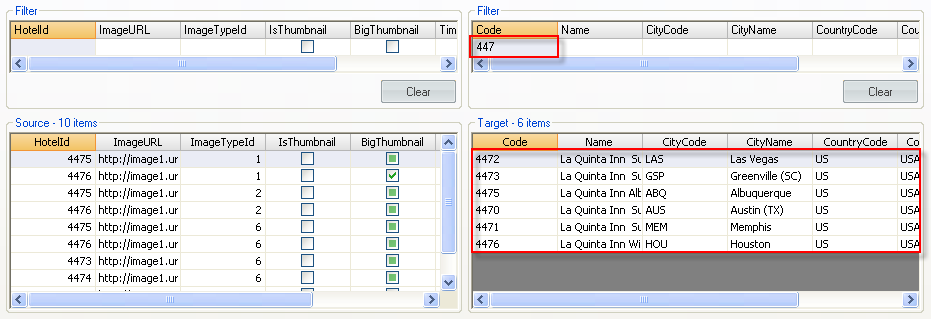
Picture 22 - Target filter
6. Select the first line in the ‘source’ table and La Quinta Inn Albuquerque Northeast
hotel in the ‘target’ table
→ and press ‘Match’ button
As a result a new line appears in the ‘Suggestions’ table and the ‘source’ hotel disappears from the ‘Source’ table. Please note, that the ‘target’ hotel remains in the ‘Target’ table, because there can be more images for this hotel in the ‘Source’ table.
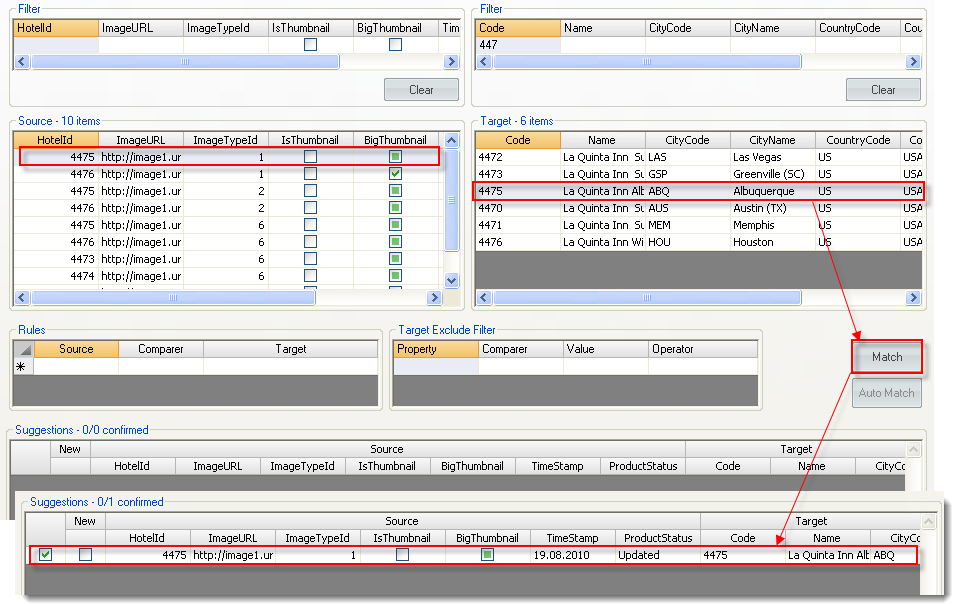
Picture 23 - Usage of 'Match' button and result of the matching
7. Set a rule to have possibility to use ‘Auto Match’ button
‘Source’ = HotelId, ‘Comparer’ = Equals, ‘Target’ = ‘Code’
8. Push ‘Auto Match’ button:
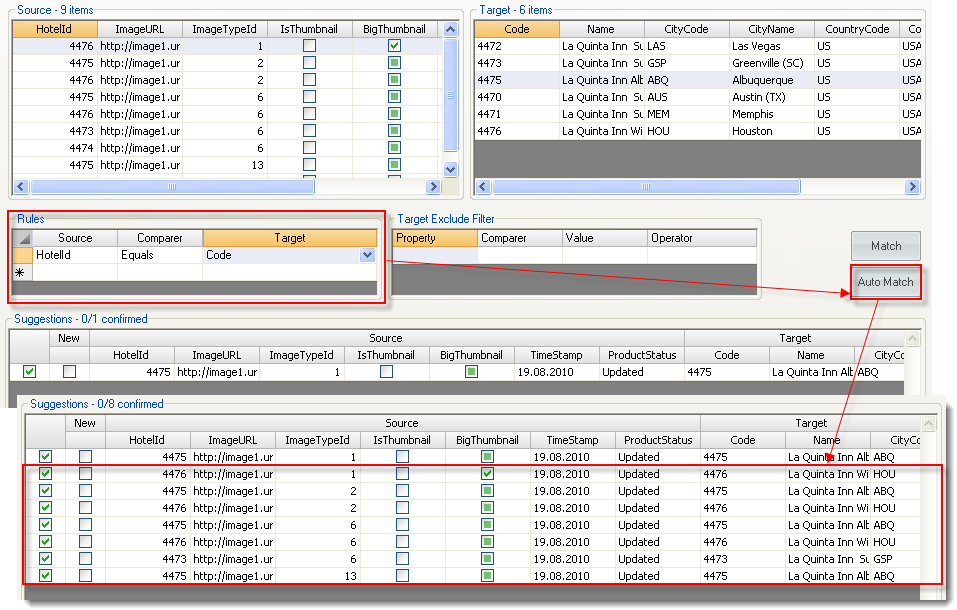
Picture 24 – Usage of 'Auto Match' button
As a result, all ‘source’ hotels have been matched.
9. Press ‘Confirm’ button:

Picture 25 - Matched and confirmed rows
10. Press ‘Next’ button
Step 3
Step 3 for Image import looks like this:
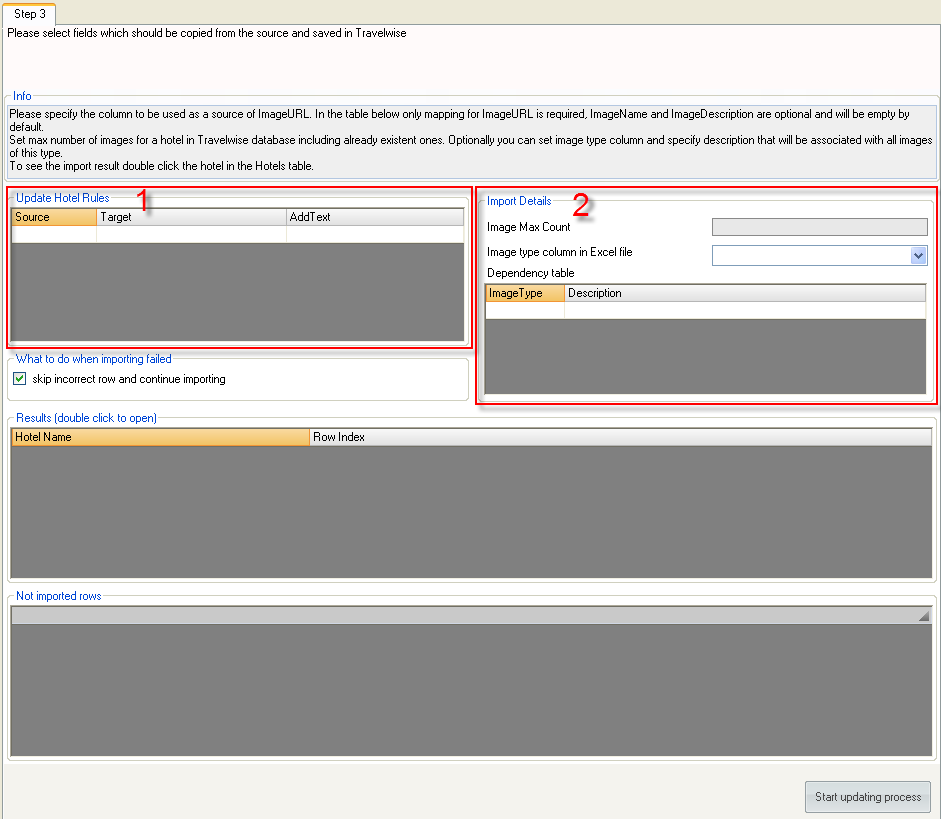
Picture 26 - Step 3 for Import Images mode
11. Determine ‘Update hotel rules’(1)

Picture 27 - Update hotel rules
12. ‘Import Details’ (2).
Set ‘Image Max Count’ = 10.
‘Image Max Count’ is maximum amount of images, which hotel has after the import.
Example:
Going to update hotel A. This hotel contains 3 pictures (before importing).
There are 5 images to import to this hotel in the source xls-file.
If ‘Image Max Count’ = 5, then only 2 new images will be imported.
If ‘Image Max Count’ = 10, then all 5 new images will be imported.
13. ‘Image type’ is used to convert image type from the source file to image description in TW.
Image type is usually a number (or code). This code means what is shown on the image: apartments, entrance hall or hotel restaurant, etc.
To identify the image type meaning, add corresponding description to each imported image:
At first, select ‘Image type column in Excel file’ in dropdown list.
At second, set up a correspondence between image type and description:
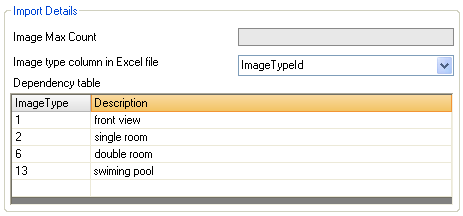
Picture 28 - Correspondence between image type and description
14. Push ‘Start updating process’ button
15. When import is finished, its results will be shown in the ‘Results’ table.
Double click on the hotel’s name to open it.
If some row has not been imported, it and its reason will be shown in ‘Not imported rows’ table.
16. To check the imported data open the hotel profile → go to ‘Images’ tab.
Import Description mode
Import Description mode is used to add descriptions to the hotels in Travelwise database.
If hotel has a description with the same Language and Description type as have been determined on Step 1, then this description will be updated. If there is no such a description, a new one will be created.
Example
There is a source file from supplier.

Picture 29 - The source file for description import
1. Go to Tools → Import → Hotel Data Import
Step 1
2. Select ‘Import description’ mode;
3. Select language = ‘English’;
4. Select description type = ‘General’;
5. Select the source file;
6. Push ‘Next’ button.
Step 2
7. Match hotels (manually or automatically)
For example, set the Rule:
‘Source’ = HotelId, ‘Comparer’ = Equals, ‘Target’ = Code
and used ‘Auto Match’ button (see Picture 31 below).
Four hotels were matched.
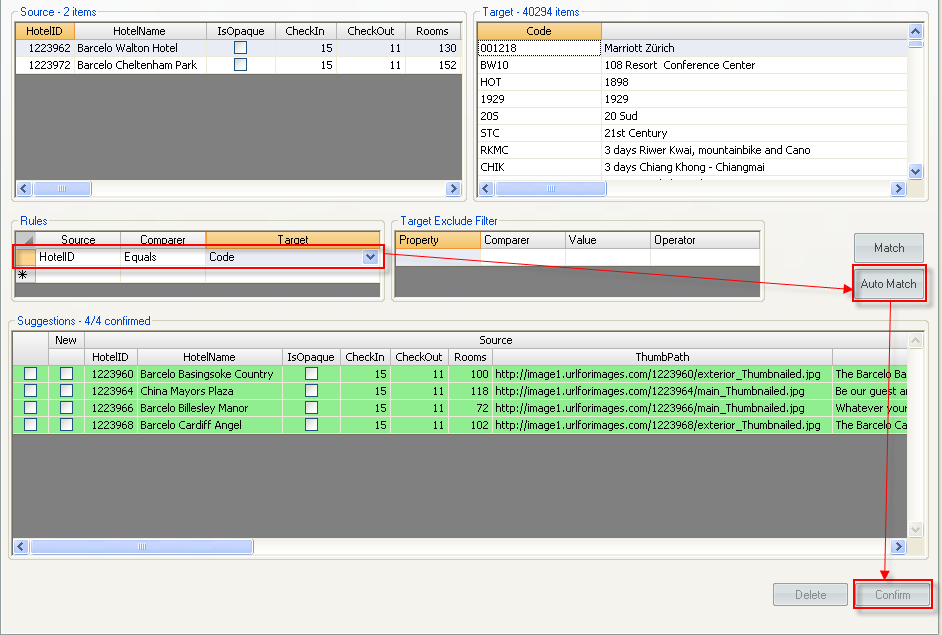
Picture 31 - Step 2 for 'Import Description' mode
8. Confirm the matched lines: push ‘Confirm’ button
9. Go to Step 3: push ‘Next’ button
Step 3
Step 3 for Description import mode looks like this:
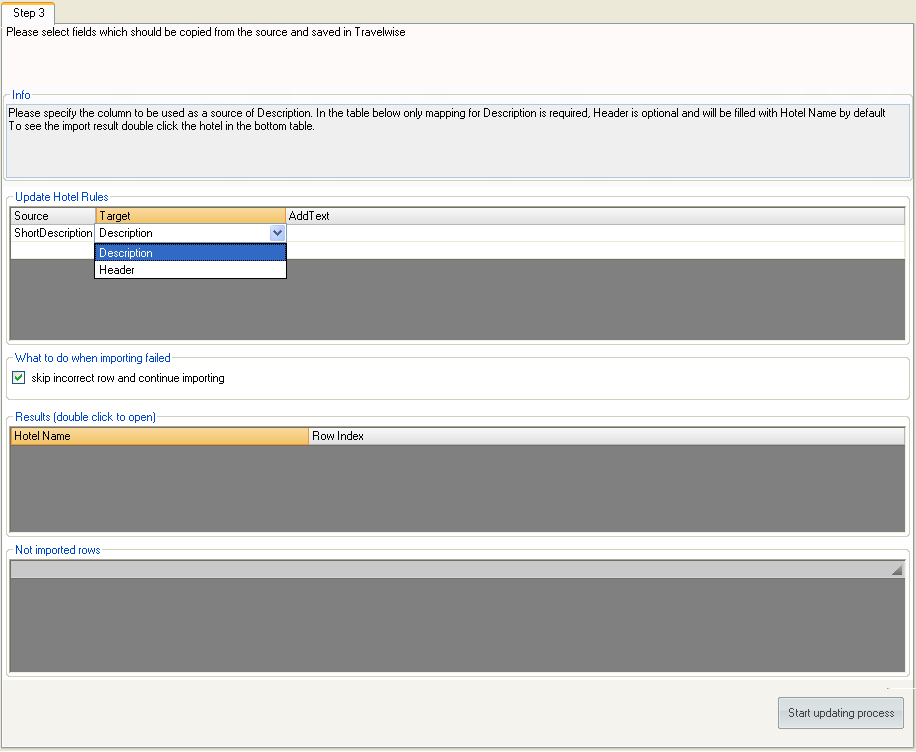
Picture 32 - Step 3 for Import Description mode
10. Update hotel rules.
Hotel description contains ‘Header’ and ‘Description text’ parts. They both can be updated during the import.
Determine ‘source’ and ‘target’ fields and press ‘Start updating process’ button.
Successfully updated hotels are shown in the ‘Results’ table. Double click on the hotel name will open it.
Hotels, which have not been updated successfully for some reason, are shown in ‘Not imported rows’ table.
To check the imported data open the hotel profile → go to ‘Description’ tab.

